In this tech-centric era of the human race, it’s rare to find a person without internet access. When it comes to the internet, VPN comes contextually. As the grasp of internet connectivity is widening across the world, the craze for VPN connections is escalating equally. Almost every tech-savvy internet user is familiar with VPN connections and their functions.
However, you may not be familiar with VPN networks if you are not that tech-savvy. As an internet user, don’t you want your online identity to be encrypted and private? Well, that's what every internet user demands. And there are several ways to set up VPNs on different devices. If you’re using a Windows PC and can’t figure out how to set up a VPN connection on your PC, this article is for you then. Here, we will elaborate on the process in the simplest way.
What is a VPN?
Before proceeding further, we are supposed to know about VPN in depth. VPN is the abbreviated form of the virtual private network. When you use a VPN, you establish a secure network connection with encryption while connecting to a public network server. As you do so, you make your network protected, and nobody else can access that apart from you. Even none can discover your online activities as you use a VPN connection.
To be specific, using a VPN makes it harder for hackers and unwanted people to access your network connection and track your online activities. Needles to specify, using VPN is a necessity to keep your network safe and your online activities confidential. You also safeguard your privacy and personal details as you use a VPN.
Benefits of Using a Trusted VPN:
It’s likely for you to connect your Windows PC with a secure VPN connection if you got a new internet connection. Before we discuss how to set up a VPN connection on your PC, it’s significant to have a favorable VPN connection. A decent VPN connection facilitates you in multiple ways. So, what can you expect from the VPN connection that you’re connecting your PC with?
It’s important to purchase a decent VPN connection for your Windows PC to ensure your network connection is safe. You can’t subscribe to every other VPN company you come across in your locality. A VPN’s credibility depends upon its services. Check out the following points to discover the services you can expect from a good VPN-
- A trusted VPN retains the confidentiality of a PC’s IP address. This is the basic function of a VPN. So, when you buy a decent VPN, it’s supposed to encrypt your PC’s IP address.
- Generally, VPNs come with kill switches. That means when your VPN connection will get interrupted, your network connection will get interrupted too. When you have connected your PC with a VPN connection, your PC gets disconnected automatically when the VPN is not active.
- A convenient VPN never lets anyone access the connection without two-factor verification. So, whenever somebody tries to access your network, your VPN will notify you about that.
It’s not advisable to subscribe to a VPN connection that doesn’t include these facilities. Now, you have gathered enough knowledge about subscribing to a decent VPN connection for your Windows PC. So, let’s jump into the process of setting up the VPN on your PC.
Step-by-Step Process to set up a VPN Connection on Your Windows PC:
Before anything else, execute what you have learned now and find a good VPN connection for your Windows PC. VPN Surf can be of great help as users are providing some amazing feedback regarding their services. Once you make up your mind upon purchasing a VPN, go through the following process to set up the VPN connection afterward.
Step 1: Log in to your VPN server
You must have accurate login credentials to log in to the VPN connection you’re got. The majority of VPN users are provided with VPN connections by their offices. If you’re one of them, request your senior authority to provide you with the login credentials so that you can access the VPN. Remember that multiple unsuccessful login attempts may lead to permanent access denial.
So, don’t try the guessing game while attempting to log in to the VPN server. Verify the login credentials twice before attempting to log in.
In the case of a personal VPN, you need to input the username and password that you created while registering the VPN server. If you have forgotten the information, get in touch with the VPN company to retrieve your registration details.
Step 2: Set up Your VPN
If you’re setting up the VPN on your Windows PC, make sure that you have administrative access to the PC. That means you need to have an active Microsoft account with administrative access. Otherwise, you can’t initiate the setup procedure.
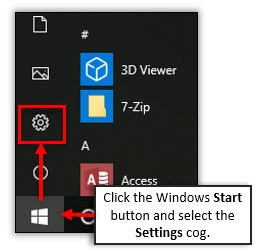
If you’re a system administrator, you need to open up the start menu by clicking on the Windows icon on your screen. You will find the logo in the bottom left corner of your screen. As you open the menu, a list of applications will come up over there. You have to click on Settings from the list of apps.
By clicking on that, you will get redirected to the settings page of your PC, where you will find the Network and Internet options.
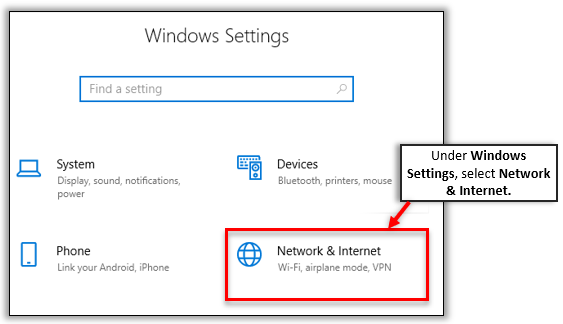
You will get a dropdown list by clicking on that option. You need to select the VPN option from the dropdown. By doing that, you’ll get the option to add a new VPN to your device. That’s it. You can add a VPN server to your PC through that option.

Step 3: Establish the VPN Connection
Now, you have got the ‘Add a VPN connection option by clicking on the VPN option. You will find a ‘+’ icon right beside the option. Click on that symbol once, and you will have a blue screen up in front of you. On that screen, you will be able to find multiple spaces to fill. Let’s see what the option are:
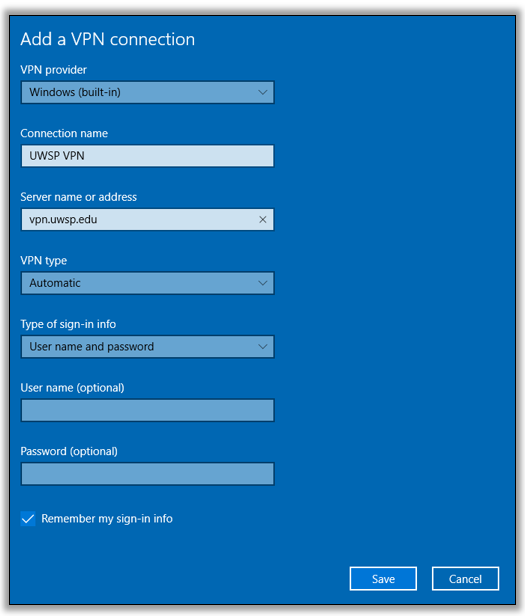
- Start with the first blank space that asks you about the VPN provider. Input the name of your VPN provider in that space.
- You will find the space to input the VPN connection name underneath that. You should put the name of your VPN over there.
- The server name or address will come next, and you are supposed to fill the blank space with the server address of your VPN.
- Next to that, you will get the option named- VPN type. You will be able to select the type of VPN protocol you want to use over there. Most of the time, the Automatic option remains a preferred choice.
- After that, you will get the option to create a user ID for accessing the VPN server and a password too.
As you have completed the entire procedure, you will find an option- Remember my sign-in info. It’s your decision whether you want your system to remember your sign-in credentials or not. Anyway, if you’re accessing a public network, it’s not wise to check the option. You should put in your login details every time you log into the VPN server. Then click on the Save option to save your details.
Congratulations! You have successfully set up your VPN connection on your Windows PC. There’s nothing more to do.
Why Should You Use a VPN?
Most VPN users remain confused about installing VPN software on their PCs. The scenario must be similar in your case too. You may not understand why you need additional software when you can connect your PC to the VPN server through Windows settings. Connecting with a VPN server through your system settings is a good option, but it isn’t convenient every time. The confidentiality of your private network can be compromised as you do so.
So, it’s a better choice to use dedicated VPN software that to access a VPN server. Usually, most VPN companies provide complimentary VPN software applications to their clients. All you need to do is install the software on your system and access your VPN server via that software. That’s you confirm an additional layer of security.
How Does Setting up a VPN Connection on Your Windows PC Help You?
You get the chance to enjoy a next-level browsing experience as you start using a VPN connection on your Windows PC. We list some of the facilities you enjoy as you use a VPN connection on a Windows system.
- Unlimited anonymous downloads are possible when you have a VPN server connected to your Windows PC.
- Numerous apps, platforms, and services have regional restrictions. You can overrule such restrictions using a secure VPN on your Windows PC.
- When you use a VPN server, you get the chance to enjoy incredible internet speed. Both uploading and downloading speeds will increase noticeably as you start using a VPN server.
- Hacking your IP address becomes next to impossible when you start using a secure VPN connection. Data encryption is the primary function of a VPN, and that’s how VPNs protect computers and networks from different types of cybercrimes.
So, there’s no point in refraining from getting a VPN network to enjoy a protected browsing experience. Online privacy should be a priority for an internet user, and VPNs ensure that.
Conclusion
Setting up a VPN connection on a Windows PC is one of the basic functions most PC users prefer to do. As mentioned before, nobody loves to get tracked by hackers and cybercriminals. Most internet users invite hackers to access their systems by accessing unprotected public networks. Also, some users do that unknowingly. Setting up a VPN is the best way to make your PC more securer than ever. There’s no chance that your online privacy will get compromised when you have an encrypted VPN. So, why won’t you utilize that facility?
This article has briefly discussed setting up VPN networks on Windows systems. There’s nothing more you need to know about the process. Also, we have elaborated on how a VPN server enhances your browsing experience. It’s a foolish act to use public networks without having a VPN server on your system. So, buy a secure VPN connection first. Then study the steps mentioned above carefully and execute them accurately. Undoubtedly, this is the smartest way to protect yourself from being a victim of the increasing cybercrime rate. Therefore, we suggest you download trustworthy VPN software, buy a subscription, and start using your protected internet connection without worries.
If you or a friend have a different Operating System check this articles now!
- How to Setup a VPN Connection in Windows 8
- How to Setup a VPN Connection in Windows 7
- How To Create a VPN Connection on MacOS
- How to Set up a VPN Connection on iPhone/iPad and Mac
Do you value your privacy online?
Use VPN Surf and surf safely and securely in the open waters of the internet.
4052